Haza! I managed to get this post in much sooner than I thought! Last time we talked about getting the virtual environment and server setup. This time, we start a 3 part trilogy of how we are going to start using automation again! This time, we start with automating my domain Sarnelli3d.com to always point to the correct IP address. Why would we need to do that? Here is why…
The Bane of Static IPs

Every device hooked up to the internet has an IP address. The modem in your home acts as a gateway between the internet backbone and to your local LAN. That modem, when it registers to the ISP gets an IP assigned to it. Sometimes that IP changes, and that is bad news for your Domain and DNS records.
For example, if you pop over to Mxtoolbox.com and crunch in Sarnelli3D.com, you’ll probably get 73.44.224.114. However, if that IP changes, Sarnelli3D.com could end up redirecting to someone else’s server or just nowhere! To keep this from happening you can pay an additional monthly fee to your ISP to have them reserve your IP address indefinitely.
Buuuuuuuuuuut… I’m a cheap ass and I don’t like paying for more than I have to. Sooo I’ll clue you all in on a little secret to work around this issue. With a little scripting magic, we can keep our site up for free.99 🙂
Get Your Kicks on Route53

Hehehe, puns… Anyway, my domain lives on the AWS registrar, as well as my DNS records. AWS’s name server manager is called Route53. 53 for the port number that DNS runs on. You can manage all your records from the web, but that doesn’t do us any good for scripting (and I ain’t writing no macro!) However, AWS does have a nifty little tool that is perfect for scripting called AWS CLI.
AWS CLI is a fantastic little package that lets you do practically everything from the command line. If we can do it from the command line, so can our script 🙂
// Running these three commands installs AWS CLI
curl "https://awscli.amazonaws.com/awscli-exe-linux-x86_64.zip" -o "awscliv2.zip"
unzip awscliv2.zip
sudo ./aws/install
// Verify the install worked
aws --version
Once you get it installed you’ll want to head over to your AWS account, pop into IAM and create some CLI credentials.
aws configure
  AWS Access Key ID [None]: The key you just made
  AWS Secret Access Key [None]: The secret you just made
  Default region name [None]: The region your name server lives
  Default output format [None]: json
Yay! With AWS CLI installed and configured we can move onto the fun part!
It ain’t Automation without a little Python

Well, it can be. I’ve actually been using lots of power shell recently. But this post isn’t about that!! The python script that we are going to write needs to do the following:
- Find out what our current public IP is
- Lookup the A record for our domain (Sarnelli3D.com in this case)
- Compare the current IP to the A record
- If its not the same we need to update it
I always like to build a skeleton before I start scripting. There are probably a few bits in this script that are going to be confusing. I heavily used the AWS CLI documentation, like getting the hosted zones and pushing the DNS changes. Amazon has some pretty solid documentation full of examples! The reason I use the OS module is to run these commands with bash. In my opinion its a smooge easier.
from requests import get
import os, json
# Get the current home IP
ip = get('https://api.ipify.org').text
# Get the IP that google thinks sarnelli3d.com should go to
publicIP = os.popen('dig sarnelli3d.com @8.8.8.8').read()

# If the current IP isn't found in the dig
if publicIP.find(ip) == -1:
    # Get the hosted zones
    hostedzones = json.loads(os.popen('aws route53 list-hosted-zones').read())['HostedZones']
    for hostedzone in hostedzones:
        # When you find the zone for sarnelli3d.com
        if hostedzone['Name'] == 'sarnelli3d.com.':
            hostedzone = hostedzone['Id'].replace('/hostedzone/','')
            # Clean it up and build the json UPSERT file
            record = {
                        "Comment": "Public IP changed! Setting to new one.",
                        "Changes": [
                            {
                                "Action": "UPSERT",
                                "ResourceRecordSet": {
                                    "Name": "sarnelli3D.com",
                                    "Type": "A",
                                    "TTL": 300,
                                    "ResourceRecords": [
                                        {
                                            "Value": ip
                                        }
                                    ]
                                }
                            }
                            ]
                        }
            record = json.dumps(record)
            f = open('R53update.json','w+')
            f.write(record)
            f.close()
            # Push the changes to AWS and profit!
            os.popen('aws route53 change-resource-record-sets --hosted-zone-id ' + hostedzone + ' --change-batch file:///root/r53/R53update.json').read()
And thats it! Right?! Well… are you going to sit in front of your computer 24/7 running this script once in a while? No dammit! This is automation, we do things automatically!
Use the Cron Luke!

That’s task scheduler for you Windows users. The cron is the whip of Linux, when you need something done on time the cron will get it done. A true Linux native would use bash crontab -e but I do enjoy my GUI’s 🙂 If you do really want to use the shell this is a great tool for explaining syntax and figuring out the frequency.
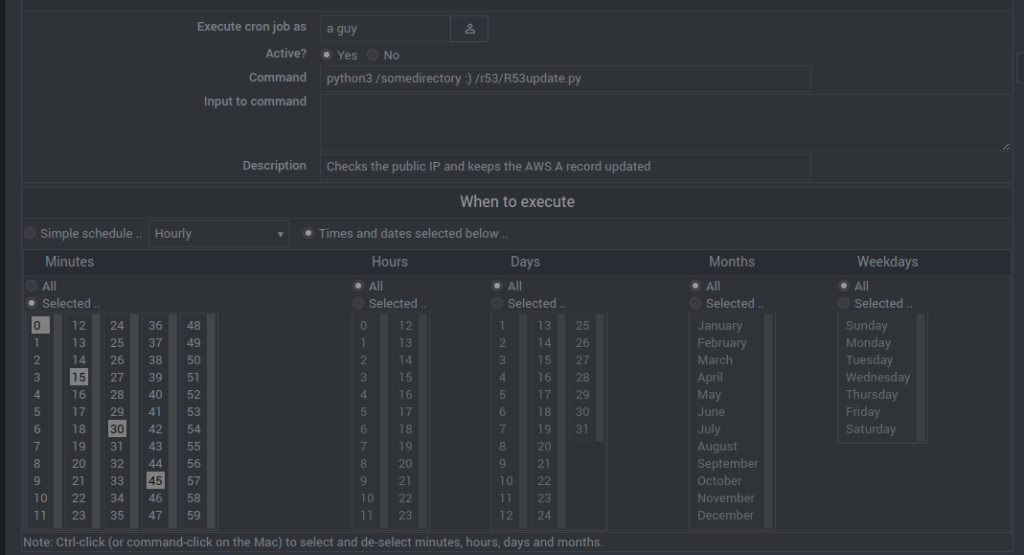
You can get to the webmin cron in the webmin tab, under the system menu and pick the Scheduled Cron jobs option. At the top click Create a new scheduled cron job. Then setup a user to run the job, put in the command that bash will run to run your python script. At the bottom, you can pick how often you want the cron to fire off. There are some presets but you can make it go off every minute if you want!

Automagic Automation

And that is all folks! Simple scripting can save you thousands! Well not thousands but at least $10 a month?? I encourage you to learn up on python and have fun ripping apart the script seeing how it works. Tinkering and dissecting is half of the fun! Eh, anyway, keep an eye out for part 2 where we get into an open source replacement for IFTT.
